October 31, 2011

Sunday Funday

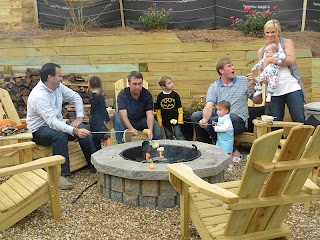
We have certainly been enjoying the fabulous fall weather here in Atlanta over the past few weeks.  On a recent Sunday afternoon, we had the luxury of enjoying the company of a few fab friends and letting our little ghosts and gobblins run wild around the yard while we sat on the porch and enjoyed the beautiful day.  What fun it is to have these special times to catch up with friends that I just now realize I've known for FIFTEEN years!  My land, where does the time go!  In the blink of an eye we have gone from being footloose and carefree freshmen at GT (who sported a fantastic win this weekend over Clemson) to somewhat responsible adults with littles of our own! 

We had a fun afternoon of pumpkin decorating, bubble blowing, tag playing and snacking.  We dined on great snacks and chili before we just couldn't resist s'mores any longer!  It's safe to say all the littles slept soundly that evening (after the marshmellow high wore off). 


Little witch M is just like her mama - gotta make sure that hair is looking good with her cutie witch hat!

A and E's littles running wild

The fellas took over the table (where snacks were hanging out of course!)

The peas all grown up

Jay Bird and mama M with their adorable pumpkin

Jay Bird giving Baby B his bottle .... future buddies (watch out if they are anything like their mamas!)

S'more time!

E, A and B taking a break fireside

Don't you want another babe A???

The messiest kid of all ....

E with her little W

The witch (aka M) enjoying her s'more

October 26, 2011

Snug as a Bug

I'm just giddy with anticipation .... like a kid at Christmas waiting anxiously and ever so impatiently to see what Santa has brought.  After much diliberate consideration, I pulled the trigger last week and ordered the most fab winter bedding from Ballard Designs.  This duvet and sheet set is just what the doctor ordered for this upcoming cold weather winter season.  I just love the muted leopard print pattern and the flannel material gets softer each time you wash it! 

I've never bought "seasonal" bedding before and always rationalized that my room stays a comfy 72 degrees whether it's the hottest July or the coldest January on record, but this adorable duvet cover convinced me otherwise.  I just can't wait until it arrives (hopefully later today)!

October 25, 2011

Monster Bash

As our countdown to Halloween continues, these sweet treats have been the feature dessert at TWO gatherings in recent weeks.  What can I say, they are just so darn fun to make (and eat) that we had to do an instant repeat so as not to let down the kiddos!

When I found these adorable monster eyeballs by Wilton (available at Michael's), I just knew monster cupcakes were in order.   And to top it off, marshmellow monsters also joined the fun as well. 

After gathering up just a few supplies our scary monster bash was in site.  In addition to cupcake supplies (the standard stuff), you need piping bags for the icing and a few fun frosting tips.  I used Wilton tip 20 and 233 to make my scary monsters.  For the pops, marshmellows, chocolate candy coating and lollipop sticks did the trick. 

Total time?  Well, just a few minutes to decorate these cuties but save extra for munching on them!


Monster bash on display

Marshmellows dipped in orange color chocolate and sprinkles make a tasty treat!

Wilton tip 20 and 233 save the day to make creative patterns for the monsters shaggy appearance 

Eyeball cupcake toppers (from Wilton) join in the fun too


This post is partying over at 733

October 24, 2011

Sweet Medallions

I have a new quick fix bow go to this fall season...try saying that five times fast!  Here's another oh so simple and quick trick to gussy up your bows and fancy up a display lickity split.... cupcake liners.  Who knew my affinity for those bite size sweet treats would pay off in a new crafty way!  I just can't help myself at craft stores, somehow adorable little paper liners always make their way into my buggy; and now I have a new way to put them to good use. 

My apologies for not capturing step by step, but it's just so darn quick there just wasn't time!

Here's How I Did It:
Supply Round Up:
  • Double side tape
  • Various size cupcake liners (2-4 per bow medallion)
  • Paper dot, punch, sticker or other quarter sized decoration (for center of the medallion)
Craft in a Flash:
1.  Take the largest cupcake liner and flatten as much as possible while maintaining the circle shape.
2.  Do the same for the smaller liners.
3.  Dabble by stacking them in various ways - try some inverted, completely flat or even keep the shape.  For the medallions pictured below, I inverted all of my liners.
4.  Stack the liners and tape each layer in place using double side tape.
5.  Use a dot, punch, sticker or some other decoration to put in the very center of the medallion.  For mine, I used two full size liners and one small bite size cupcake liner.  The center is about a quarter sized and I printed off a little "Trick or Treat" decoration for the center.
6.  Tie the bow as you normally would, and then use more double side tape to attach the medallion to your bow and / or vase.


This post is partying over at A Mommy's Life

October 21, 2011

Fall Craft Day Flash Back

From time to time, I recruit some of my fab friends to participate in what I lovingly refer to as "craft day".  Depending on our mood, we pick a theme and everyone bring supplies, yummy appetizers and some vino to help inspire creativity in one another and craft together.  I supply a bunch of Ok, it's fair to say that most everyone uses this as an excuse to bring supplies and tell me to make something.  Of course I comply because I just love doing this stuff!

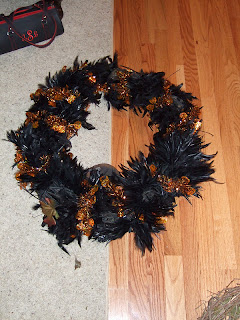
We did one of our craft days a while back focused on fall wreathes.  Here's a few of the little gems that we creatively designed over a few glasses of wine.  I love that even after a few seasons, I can drive around my neighborhood and find these beauties still on display this time of year!

So take a gander and get inspired!


This post is partying over at CSI

October 20, 2011

Quiet as a Mouse

There's still a few more days before Boo Bash 2011, otherwise known as Halloween.  As widely made popular by Miss Martha Stewart herself a few years back, the black silhouettes of little spooks make a great addition to your festive decor.  This year, I tried to keep thing under control and not go overboard with the idea, even though I came ever so close to adding some last minute bats to mirrors and a collection of antique white plates that are featured in my living room.  As such, these little mice sweetly scamper up and down my front foyer and hallway.  I must confess .... I've startled myself a few times now thinking there was something there only to realize it was my very own handy work.  I guess they do the trick.

To use these templates, just copy the pic to a document or presentation (Word works just fine) and expand their size to fit on your molding or wall.  Print on thicker paper or card stock and simply cut out with an exacto knife or sharp scissors.  Voila!

October 19, 2011

Cutest Pumpkin in the Patch

It just wouldn't be right if this October breezed by without us loading up the car and heading to the pumpkin patch.  After all, it's Baby B's first trip and so of course we had to make it memorable!

In years past, our annual trek involves a drive up to Dawsonville to visit the renowned Burt's Farm where one year we dropped a cool $150 on a SINGLE giant pumpkin (story for another day, and Dear Hubs was to thank for that idea ....).  But since the trip to Burt's typically means elbowing at least ten other aggressive mamas out of the way to get to the perfect picture spots, we decided to venture to a slightly lesser known gem at Berry Patch Farms.  I must confess, nothing compares to Burt's but our visit to Berry Patch was fun nonetheless.

After figuring out how we would get a jogging stroller onto the tractor hayride out to the patch, we had a quick ride to the action.


Followed by a few minutes of coaching the talent on what's in store.  Oh, the things we do to get a good pic of dear Baby B! :)


And finally, a few great shots magically happen!


And of course a cute fam shot to round out the fun!  We had a great time and enjoyed the great weather and pumpkins everywhere we looked!


October 14, 2011

The Mom Challenge

Well this back to work "thang" sure has hit full speed now!  This week, I spent my first TWO consecutive nights away from home on the road in the fantastic cities of Tulsa and Dallas.  Thanks to having a wonderful partner and daddy in Dear Hubs, the transition away from home and back on the road has actually gone pretty seamless.  While I try to minimize the time away as much as possible, there are those crazy weeks when travel just can't be avoided.  And yes .... no matter how focused and career driven you are, guilt of being away doesn't escape you. 

And that's what brings me to today's topic ....

I recently came across this gem of an idea over at imom and fell in love with the idea.  Whether you work or not, travel or not, or any reason in between ... we could all use a helpful and gentle reminder of small ways to be the best mommies we can be. 


The concept is that for 30 consecutive days, follow the little tip outlined on the chart.  If you start on October 15th, for example, you start on #15 and just work your way around the chart from there.  I just love the reminder to focus on patience (when there just isn't enough) and to replace sarcasm with kindness (just because I think my wit is funny doesn't mean Baby B does).

Scoot over to their site to download a copy of the list and start your 30 day challenge lickity split!

October 13, 2011

Burlap Bonanza

Is it obvious by way of recent posts that I just love burlap?  Over the past year or two, I've updated much of my household decor with natural looking materials and elements.  Gone are the plaid, buffalo check silk drapes in my kitchen ... and in their place are lovely natural colored linen panels.  Say goodbye to old lampshades and in their place we welcome burlap or woven seagrass ones.  It's the little touches that seem to keep me busy these days and I think make a fashionable update to my rooms without a hefty pricetag. 

One such update was a prized find (aka steal) from Scott's Antique Market.  Months back, I secured a large treasure of burlap remains from one of the vendors.  He specializes in stamped burlap lampshades, chairs and all sorts of lovelies that are just beautiful.  Well, my good fortune was that he had a huge heaping pile of "mis-stamps" that he was ridding from his inventory for a few dollars a piece.  I scored quite a few darlings with a $5 price tag and couldn't be happier. 

When I arrived home with my new prized steal, Dear Hubs didn't exactly see it the same way.  His response to my proud "Look what I bought sooooooooo cheap" was "That's great ... what are you going to do with it?  You know it's not a deal unless you need it."  Well, while his sensibility put a damper on my spirit for a moment, I set out to determine my "need" for this. 

So, one of the beauties now proudly hangs in a gorgeous bronzed wood frame in my kitchen.  Complete with a cute pic of Baby B and my rooster lamp from Neimans ... the antique table is now completely set, don't you think?


~charmed, b

October 06, 2011

Boo-tastic decor

Dear Hubs ratted out our new Nanny D this week.  Apparently after I had hopped off to work Monday morning, she inquired if I go THIS way out for all holidays or if Halloween was just a special one.  Oh dear Nanny D ... you haven't seen anything just yet.  I'm sure the shock of Christmas is something I should brace her for well in advance. 

As is always the case with the first October weekend, I pulled out my big storage bin of supplies and as Baby B peacefully napped on Saturday morning; I set out like a little Halloween elf covering everything in sight in orange and black glitter and sparkles!

My selections for this fab decor are always more on the whimsical side and I haven't yet crossed over into the scary stuff.  For now, we will stick to large polka dots, glitter, shimmer and fun pumpkin pieces that I love; and Baby B is already quite fond of too! 

The kitchen island is now home to a few fun pumpkins in addition to our standard glass pieces.  The oversized vase received a scary touch from some glittery spiders dotted around.  And this year, we welcomed a new bat pumpkin compliments of a kit from Home Depot.  A monogram and polka dot pumpkin and some cute ribbon round out the vignette. 


The kitchen table was gussied up a bit thanks to some new fun twinkle from the chandelier.  Giant spiders hang from a ribbon and tulle covered form giving us something fun to look at as we dine!  Baby B is already fond of the spiders and could stare at them for hours!  It must look like a giant mobile to him!


The front foyer table is now home to our most fun vignette.  This cute, spooktacular sight serves as home for some odds and ends I've picked up through the years at Home Goods, Michaels and other regular spots as well a few creative printables that add a fun touch. 


We added a few other touches to the hallway with some cute paper lanterns hanging over the archway into the family room and little mice scampering their way in from the front door. 


Now, this weekend's goal is to finish up the basement decorating and do a little wreath swap on the front doors.  Stay tuned!  Halloween will be here before we know it!


This post is partying over at A Mommy's Life

October 05, 2011

Chandy Re-Do

For some time now, I've had my eye on one of a few GORGEOUS chandeliers at Restoration Hardware.  With all the household projects we have had going on for the past few months, and the added expenses of Baby B's nursery and what not; I haven't quite had the courage to break the news to Dear Hubs that I'm just dying for a new chandelier for the kitchen,  at a price tag that would make your heart race no less!

And so, I quietly sit idle and wait for the perfect time to spring the news.  Until then, I just had (HAD) to do something to get my mind off of the new beauty that could be hanging there and decided a little redo was in order.  Sure, sure, sure ... there was nothing "wrong" with the before chandelier.  It was traditional and went with my decor but ... it just was missing something fun and now that I felt was necessary. 

Before:  Nice, Normal ... Expectedly Average


Inspired by a little project Dixie Delights showed us a little while back on her blog, I set out with creative energy to burn!  While my original idea only included spray painting the chandelier candle sticks, I actually wasn't too pleased with the results and found myself covering them instead.  And now, I'm pleased as punch with the results!
 

After:  A fun change!


Here's how I did it:
Supply Round Up:
  • Burlap scraps (I know, I know ... how many scraps do I have???)
  • Neutral spray paint
  • Two side tape
  • Round chandelier bulps (available at Home Depot)

Craft in a Flash:
1.  First, I removed (and saved) the existing chandelier lamp shades that I had.  I may need or want them again so they were saved from the trash ... you never know!
 2. Remove the candle stick plastic coverings. Mine were actually discolored from the heat of the bulbs!


3.  Spray the plastic covers with the neutral spray paint.  I selected a metallic bronze color paint because my initial plan was to leave it at that, but due to wear, tear and age on the covers the paint didn't apply all that great. 


4.  Cut burlap to cover each of the plastic covers.
5.  Apply burlap over the painted cover and secure using two sided tape.
6.  Trim excess on edges.

7.  Replace the covers on the chandelier and swap to new round (trendy) bulbs.


8.  Bask in the glow of your new chandelier!


~charmed, b

This post is partying over at A Mommy's Life