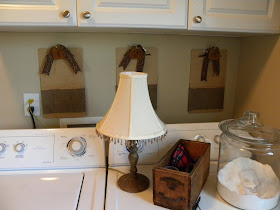
So, armed with some extra burlap from my fall decorating; I had the great idea to create a communication station in our laundry room to give my controlling side a little sigh of relief.
The new little addition of a basket for mail and odds and ends as well as 3 clipboards will hopefully (fingers crossed) ensures that we stay on top of our game when things get a little crazy. The 3 clipboards have been designated for (a) Nanny Notes: to keep post it requests at bay, (b) Shopping Lists: for reminders of things we are out of and need to pick up while we are out and about and (c) A multi-month calendar: because when travel schedules pick up Dear Hubs, Nanny D and I need to know who's where when!
Here's how I did it:
Supply Round Up:
- Basic clipboards - I bought mine at an office supply store for $2 a piece
- Burlap scraps
- Ribbon
- Mod Podge and brush
- Marker or straight edge
- Scissors
Craft in a Flash:
1. Cut your scraps of burlap to fit the clipboards. I wanted my burlap to be like a band around the bottom half of the clipboard. To do this, I cut a strip of burlap that covered the front and wrapped around about 1 inch onto the back.
2. Measure where the burlap embellishment will be and mark it with the marker and straight edge.
3. Using the Mod Podge, coat the marked off area (from above) with Mod Podge and affix the burlap. Then, coat the burlap with a heavy dose of Mod Podge on top of the fabric. Be sure to go over the edges onto the clipboard - don't worry, it dries clear.
4. Once the front is covered, complete the same steps on the back edges that wrap around.
5. Let the board dry completely.
6. Add ribbon or other embellishment to the top of the board. For mine, I added a cute leopard ribbon and some sweet 1-2-3 tin tags that covered the metal clipboard clip almost entirely.
7. Hang cute paper on each board. For mine, I created templates for "Beckham's Babbles: Notes With Nanny D" so that we can keep track of odds and ends that would otherwise be sent to post its as well as a shopping list and calendar.
8. Hang (along with a pen or pencil) and get organized!
~Charmed, b
This post is partying over at A Mommy's Life


