July 31, 2012

A Cocktail or Two...

With family in town earlier this month, I took the opportunity to experiment on them like they were lab rats dazzle them with  new recipes .  Among the tested recipes, two cocktails topped the list and will make a repeat debute occassionally around these parts!

Not only were these two cocktails another great excuse to drink out of Mason Jars, but they were also a welcome change from our standard drink rotation here!

First up is a Berry Blast.  It's light and fruity and goes down way too easy!  Mix 1 part Trader Joe's French Berry lemonade, 1 part club soda and 1 part blueberry vodka.  Delish.  After one or two, we became brave and started mixing various fruity vodka flavors with the club soda mix.  When you want it less sweet or less strong ... simply adjust the 1:1:1 ratio. 


Next up is a delish cherry beer-garita.  Don't let the name fool you.  This bevvy will have the men happy for manly-ness of the drink and the gals pleased with the cherry nature too!  It's a win across the board.  And, should likely be renamed "Call a Cab" because after 2 of these you most definitely will need too!

This recipe was a gem I found on pinterest.  The graphic below is the best recipe ever ... how simple and informative is that?


Like I said ... even my toughest critics (Pop Pop and Pops) agree they were a smashing success!  Cheers, y'all!

July 30, 2012

Clean Eating

What if I told you I have uncovered the Holy Grail of healthy, fast dinners?  That's right ... now you are interested!  It feels like forever since I posted a recipe or two.  Fear not, we have done our share of eating and entertaining around these parts! 

Over the course of a week, I took on a challenge to prepare a home cooked meal every week.  While I love to cook and do serve my family homecooked goodness most weeks; we all have our days where we give in and cut corners!  I was inspired after reading "Eat This Not That for Kids" that we needed to clean up our hungry ways.  So, I consulted my fave Clean Eating magazine (which has an amazing recipe listing online too!) and grabbed down a few select recipes to keep me busy. 

Fortunate for me, Clean Eating has a section of recipes titled "20 minutes or less".  And, while we all know that basically nothing can be completed in 20 minutes when you arrive home after a full day of work, are standing in the kitchen in half of a business suit (after loosing the jacket, 5 inch heels and various jewelry components), and having a small little person tug on your leg ... I must confess they were pretty darn close to the 20 min promise. 

I'd strongly recommend 3 of these recipes.  Rest assured some are being served again around these parts this week!

The Fresh Pizza with Mozz, Spinach and Veggies
Country Fried Steak that's Healthy ... I'm in!


Herb Crusted Chicken with a tangy sauce that is to die for!
While I must confess, I do make the recipes my own and don't follow exactly ... the week's dining consisted of Country Fried Steak with mushroom gravy that was definitely a reasonable alternative for the "fat" version.  The Skillet Saute Chicken with a zippy, tangy sauce was impressive.  While I didn't follow the recommended seasoning to a "T", it was close enough and the sauce turned out fantastic.  With no dijon mustard on hand, I used regular yellow mustard and added some of my fave Savannah Bee Company Honey.  Lastly, the delish Flat Bread Pizzas were just what the doctor ordered.  Iadded some veggies, but rest assured these are already on the menu for the coming week simply because they are so easy and so healthy!  Not only are ease and health a criteria ... all of these are just delightlfully tasty.  I'm completely sold.  Each recipe was created with swift timing and was between 200-400 calories.  Scoot over and check them out!  Impressive, I do declare!

July 28, 2012

First Fete: Balloon Topiaries


FOLLOW THE NEW BLOG AT Being-Bianca.com for more crafts, recipes, decor, parties and FUN!


We took a short break from first fete "how to" postings, but scroll on back with me and check out the fun party dish on this post here and here.  One of the perfectly functional and festive details of the party were the balloon topiaries. 

After picking up a few balloons for the photo shoot with Baby B, I realized helium balloons weren't going to cut it for this fete.  Not only do the stores near me charge OVER A DOLLAR per balloon for helium filled balloons but those pricey party makers don't last too long in the Georgia heat and humidity.  The balloons were only perky for a few hours; I knew there had to be a better way.


The answer required some dollar store balloons and a few supplies from my fave Home Depot.  With a little Maguiver style skills, the balloon topiary was born!
These balloon topiaries outlined the lawn and were placed in a few decorative spots to add a punch of color and fun.  I also made smaller topiaries and used them on the sweets tablescape.  They really did round out the space well.
Here's how I did it.
First, you need a few simple supplies:
  • Balloons
  • Twine
  • Long dowels - available at craft stores or home improvement stores
  • Painters tape
To assemble:
1.  You will need a bunch of balloons, so start puffing!  Luckily, I enlisted the help of the fam and we zipped right through this step.  For each large topiary, you need about 6-8 balloons depending on size.  Be sure to make a few extras just in case you have a pop!  The shadowy figure in the pic below is Baby B apparently flexing his little muscles as he played in the balloon patch!


2.  Start by tying a piece of twine (about 1-2 feet long) around the base of a fully blown up balloon.  A simple knot will do.  Then, grab a second balloon and tie it to the first.  Keep attaching and knotting.  I tried wire, pipe cleaners and a series of other supplies.  All were too rough for the delicate balloons.  Note, if you have an extra set of hands this step is a breeze.  For my topiaries, Dear Hub's dad; Pop Pop, was my assistant and we flew! 
3.  To attach the dowel, it works best to again have a helper.  For this step, tie the two tails of the twine to the dowel.  This attaches the balloon bundle to the stick.  Then, we used painters tape to run around the knot area to secure it in place.  Painters tape worked perfect because our balloos were mostly blue. 
4.  We finished them off with some paper streamers as ribbons and voila, complete!
Tips and Tricks:
For the table top version, I used very thin dowels and placed them in floral foam that filled my old paint cans.  For the yard version, we used thicker dowels that were a few feet tall.  To actually get these in the ground, we used a hammer and an extra dowel to make a hole in the ground and then simply added our cute topiary to the existing hole.  Yes, Dear Hubs almost had a fit when I announced I was putting holes in his yard.  But, in the spirit of the fete, he went along with the idea!


So y'all remember this trick next time your party calls for balloon overload!  xoxo

July 27, 2012

California Dreamin'

This week, my work travels took me to my most fave place on the planet; Southern California.  While work was busy, there were a few free moments that I stole away for fun. 
I was able to steal away bestie S, who is conveniently a co-worker too, and meet up with bestie C and another college friend C.  We dined on a delish champagne brunch at Bayside in Newport Beach.  Over the years, bestie C and I have made more than our share of appearances at Bayside brunch and it has become a tradition.  The champagne flows freely, mimosas are divine and the food is to.die.for fresh and lovely.  I opted for a fresh salad and an open face lobster salad sandwich on thick brioche bread.  Simply amazing. 


Shortly after the time with friends, my focus did shift to work, promise.  In between meetings and quality time with my laptop; I was able to break free and go for a few jogs on the beach and sit outside at the resort to enjoy a few California sunshine rays. 


Huntington Beach, my home base this week, is host to the US Open Surfing event.  The festivities have quite a draw and lots of interesting sights to take in. 


My other fave thing to do in Orange County is to hit a few of my fave shop spots in Newport and Laguna.  I'll detail on the elaborate finds separately once I unpack my finds at home, but these spots are simply tops! 
Here's to a great week workcation.  Now, to get on home and see my fellas that I missed dearly this week!

July 22, 2012

The Rule

I ooh'ed, ah'ed and added a few versions of this to my "must do" list when I saw the idea on pinterest.  I swear y'all ... I could spend days on there! Trouble is, most of the things I pin are so aspirational that there just isn't time in this busy diva's day to pull them off.

In this case, I found the adorable pics I'm sure you have all seen ... the giant life size ruler that you make and put on the wall to measure the littles each year on their birthday.  Y'all, I must apologize for the poor pics to follow.  Quite simply, it's the foyer entry way from the garage and let's be honest ... not super lighting! 


Anywho, this was something on my to do list, but actually finding the time to "do" ... well, that was a challenge.  Just a few weeks before the babe's first birthday, I visited creative, crafty bestie M's home and saw that SHE ACTUALLY MADE IT.  After she explained the steps, I knew I had to kick my booty into overdrive and ensure I had mine ready before Baby B's first year checkup. 

Best part ... this was actually a really easy craft.  The most challenging part is ... well, getting it right the first time!  Trust this diva, I'll explain.  It was a snap to craft and such fun.  I had the best time updating the big ruler to proudly report Baby B's birth and year 1 stats this week.  This may be the only reason I'm ready for Baby B to turn two!  Keep him this sweet age forever.

Here's how I did it:
Here's what you need:

  • A long 1x6.  In our case, we expect tall littles ... so we went for a 6+ foot board and then offset it on the floor so it was almost 7 feet when complete. 
  • A small container (sample size) of stain
  • A Sharpie - the newer the better!
  • A ruler
  • Sandpaper
Here's what to do:
1.  Begin by sanding the wood.  It's important that it's smooth.
2.  Apply the stain to the wood.  Note, I went with a provencial wood stain and it looked medium tone on the sample.  The wood absorbed the stain very quickly and it was much darker than expected.  I did this project after Baby B went to sleep and did the staining on my porch.  A dollar store table cloth served as a drop cloth.

3.  So, going with the flow ... I sanded off some of the top coat of the wood and actually found myself using what was initially the back side of the wood.


4.  After letting the stain dry entirely, the only step left is to draw the ruler.  To draw all of the tick marks, I used a ruler.  For my ruler, I pre-measured that the board would stand about 9 inches off of the floor, so I started the tick marks just shy of a foot.  That way, my 6 foot board would measure up to about 7 feet tall.  I first tried paint and had the bright idea to paint cream colored tick marks.  The reality ... that was a messy disaster.  So, plan B... I used a Sharpie marker to make the tick marks and complete the next step.
5.  For the numbers, I used the same process I explained here.  I just traced the numbers onto the board and filled them in.
6.  If you desire, apply a clear top coat. 


In just a few easy steps, my board was ready for hanging.  As for Baby B, he's measuring in just shy of 33 inches for his first year check up.  That's right folks, over 97% for the height on this little fella! 

xoxo!


July 16, 2012

Sitting Pretty

I've professed my love for all things oyster before and twine, well... that's kin to burlaps which I've talked plenty about.  Using the technique I described here.  I took an old lantern down from an old storage shelf and gave her a prized new spot in the main floor guest bedroom suite. 

This is a simple black lantern that was gifted to me who knows how long ago.  Trouble is, it was a tad too modern for my taste and would be stored high up on a laundry room shelf unless the perfect party called for her presence.

Now. with a little lipstick (aka oysters and twine), she's sitting pretty every day!  I wrapped the bottom portion of the glass in twine.  Then, added just a handful of oyster shells that were on hand from previous crafts and apothocary jar fillings (I may have stolen one or two from an existing display!) with permanent glue.  Since the shells are so uniquely shaped, I added some floral moss between them. 


Oh, and that chair in the pic was one of my fab finds from the Ballard outlet. Months back, it was marked with a crazy low price and with all the discounts they offered - it was mine for under $20!  I was just giddy to find it.  Dear Hubs thought I was crazy when bestie A and I did a quick "run through the shop" while he and R sat in the car with a cast of littles.  We surfaced promptly with this chair and a few other finds.  Let's just say it was a cozy ride home with this extra loot in tow.


This previously empty corner of the bedroom is now sitting pretty! 

July 14, 2012

First Fete: Smashcake, Cupcakes & Snacks


FOLLOW THE NEW BLOG AT Being-Bianca.com for more crafts, recipes, decor, parties and FUN!


As promised on the first party post here, I thought I'd give y'all a good look at the sweet treats from Baby B's first fete.  The treats were so tasty and enjoyed by all.  Baby B thought his own smashcake was just tops! 

While the Varsity truck fed hungry bellies around the corner on the drive, the sweets were displayed on a big table on the back deck. 


Here's a few of the tips and tricks of this sweets production: 

Tablescape
The large chalkboard behind the table is a last minute crafty.  I have been on the hunt for a big ole' chalkboard for some time.  Trouble was, I didn't want to pay the hefty price for a big one that was decorative and I really don't have a need for yet another plain Jane chalkboard.  (as I've explained here ... I have a chalky addiction).   I found a very large scrap of press board in the basement that Dear Hubs had hid away (for who knows what purpose) and simply covered it with a few coats of my handy chalkboard paint.  Seriously ... do I use that stuff on everything?  Topped with some large paper pennants, it was the perfect backdrop for the sweets table. 

Table clothes were loaded up in white, blue and topped with burlap.  Since it was outside and thunderous clouds were looming, I actually opted for disposable tableclothes and topped with a burlap runner.  The garland across the front is comprised of various red, white and tons of blue fabric scraps.  I LOVE this garland and have plans to make another one.  A box covered in craft paper served as the perfect tier for the back of the table to give dimension.  Tiny paper pennants that matched the invitation hang across the front of the box and the plate stand.

The balloon topiaries are in silver paint buckets that I had on hand.  You can find yours at a local Home Depot for just a few bucks.  These have served me well through the years!
 

Treats

Since we had such a crowd to feed, I opted for cupcakes. I had originally envisioned a monster sweet sensation for Baby B's first fete, but when reality set in that it would be 100 degrees, melt and look like a hot mess ... well, cupcakes it is! To save my sanity, I actually outsourced the cupcake baking. (gasp, I know).  I always bake my own treats, but this time, with gentle coaxing from Zsa Zsa, Dear Hubs and every bestie known to man, I decided best to save my sanity! The cupcakes were topped by moi, partial credit right? I made large fondant ones and a polka dot in blue, then added a cute sour cherry candy.

They were super cute when all was done.

All that said, I couldn't bear the thought of Baby B's first cake being from someone other than me.  So, I DID bake that giant cute cupcake that Baby B would be smashing shortly after this pic below.  Using my oversized cupcake pan, I simply baked a yellow cake and topped with white icing using a wide Wilton tip.  I hung a pennant banner from two grilling skewers.  It matched perfectly with the individual cakes and was a great focal addition.  Certainly, my critic was a fan!


As if tummies weren't full enough, in addition to the sweets; we had yummy roasted peanuts and popcorn for snacks.  Dear Hubs helped out and rolled our large movie style popcorn machine around from our media and game room on the terrace level.  With the music cranked up and attendees firmly seated for the mainstay, these treats came in handy!


Favors

As the night went on, the kids negotiated opening their favors early.  Going along with our theme, I opted for oversized carnival style lollipops.  I found these cuties on Amazon (they were better in size, style and price than any other site I checked!).  Only trick, there was a large label on the pops already.  I used the same old school typewritter font as the invites, labels and all other notes to whip up some large labels for these favors.  To display, I filled a vintage Coca-Cola crate with floral foam, topped with paper shreds and presented the pops in this tray.  They were just darling!        


They were a hit with all!


Hope y'all enjoyed the sugar rush! xoxo


July 13, 2012

Show Home Slow Motion: Living Area

Every chance I get, my big camera and I show up at a charity show home.  Typically with bestie M in tow, but unfortunately not this time due to a fracture in her foot (still not real clear on what happened to cause a diva to go down!).  So, I recruited bestie P and new friend A to fill in for decorating genius M.  With Baby B in tow (thanks to failed babysitter plans), we made a great afternoon of touring the Roswell Women's Show Home.  Such a wonderful event full of inspiration and supporting a good cause of local charity.  Take a slow motion look at the tour with me now and prepare to be inspired!

This year's show home is a lovely, warm and family friendly space in Alpharetta, GA.  Each year, the club selects a home and recruits local, talented designers to participate by sponsoring the design, theme and decor for a room.  The result is always just perfection!

Here's a few worthy snaps from the main living area; which includes a spacious kitchen, keeping room and family room.  It's warm, clean and every so comfortable with the natural touches and spacious design.  Love.


Next stop ... the many bedrooms and kids areas!  Too many snaps for one post!  xoxo

July 12, 2012

The First Fete

Weeks of brainstorming, hours on pinterest and countless "wouldn't that be grand" sort of moments came together this past Saturday as we celebrated the dear sweet Baby B's first birthday.  Hard to believe that tot is a year old. 

His big day started with a celebratory donut for the special occassion.  Fear not, I didn't let him eat the entire thing, there was plenty more sugar where this came from!


We spent the afternoon playing on the new slide fort, a birthday gift from the grands and prepping the lawn for the extraordinary party to come!


Shortly before party time, we had a little thunder shower scare, so we set up for the party not once but twice!  Lordy me, we had good practice after the first setup / dry run and the second time was a snap. 
I'll share all the many cute details and the how to's over the coming days, for now ... enjoy these fun pics. 
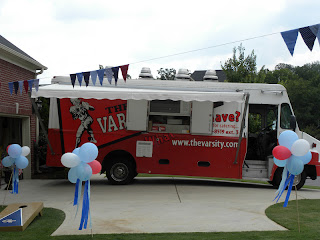
For a party of about 60 guests celebrating Baby B's big first birthday, I planned a vintage lawn party with a Southern twist.  We wanted it fun for littles and bigs of all ages.  Dinner was catered by the Varsity food truck.  A band was on hand to sing silly songs and hits we all know.  Treats and cold beverages kept everyone full.  And games were played along the lawn to keep everyone busy. 

The invite set the tone for the event

Posing with our friend from the Varsity

Sweet Bestie M and Family

Buddy T and her boys enjoying Varsity treats
The truck arrives and we are ready for fun!

The line forming

Musical entertainment on the lawn

Cupcakes for guests and smash cake for B

It was a hit!

The sweets table

Dear Hubs and the Grand Dads

Bestie A and her fab fam from Charleston

Zsa Zsa

Enjoying the fun

Lollipop Time!

Wagon Pushing - who is doing the work here?

Happy Birthday, Baby B!


I promise more close ups but I'm beginning to feel like a proud grandma tossing books and books of pictures out here.  More to come!  Happy Birthday, my precious baby B!  xoxo